
You might be wondering how to alter a bra pattern for better band fit. But before I show you those alterations (and I will, I promise) please be aware that a bra band alteration is not simply about making the band bigger or smaller. It is about restoring balance between the body, the pattern, and the materials. Once you understand how the bra band functions, the next step is learning how to adjust a bra pattern for better bra band fit.
A common mistake is to assume that every band problem requires simply adding or removing length at the center back. In reality, the band is a three-dimensional structure that interacts with the cups, cradle, underwires, elastic, fabric, and closure. A successful alteration depends on identifying where the problem is occurring and understanding which part of the pattern is responsible.
Before altering, always evaluate:
Once the cause is identified, the correct adjustment becomes much clearer.
Shortening the band is one of the most common adjustments when a bra rides up in the back or feels insufficiently supportive. A longer band has less tension around the rib cage. Reducing the band length increases the amount of tension and helps anchor the bra more securely. However, it is important to shorten the band in the correct location. Simply removing length from the center back may create a band that fits tighter but does not necessarily maintain the intended shape of the frame. It pushes the straps closer together at centre back. Adjustments to the length need to be made in the back band between the side seam and the strap scoop area. This keeps the side seam consistent. Even a small reduction can make a dramatic difference in support.
The good news is that in my Beverly Johnson Designs and the Pin-up Girls patterns, you can go up or down a band size (even two if necessary) to get the length you need. Just use one band length larger or smaller than the one you use now.
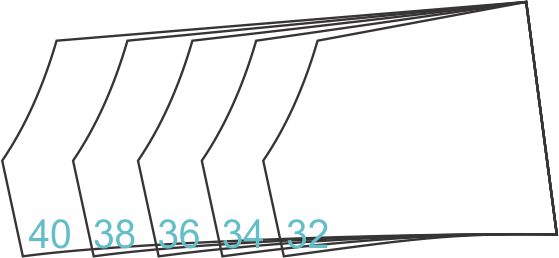
But what happens if you don’t have one of my patterns and their easy-to-adjust bra bands? Here’s how alter any bra band and make it shorter:

Some wearers need additional band length, particularly if they have:
Lengthening the band allows more circumference around the body and reduces tension. However, adding length without considering the fabric and elastic can create a band that becomes too loose. The goal is not simply to make the measurement larger – the goal is to achieve the correct amount of tension.
When lengthening:
Here’s how to alter any bra pattern in order to lengthen it:

Sometimes the pattern is correct, but the elastic is changing the way the band behaves. Firm band elastic can make a band feel smaller and more supportive. A softer elastic can make the same pattern feel more comfortable but potentially less stable. Before changing the pattern, consider whether the elastic is the actual source of the problem.
For example:
This is where the Elastic Trifecta™ becomes essential: Stretch + Recovery + Resistance determine how the finished band will perform. For lots more information directly related to elastics, I have links at the bottom of this post.
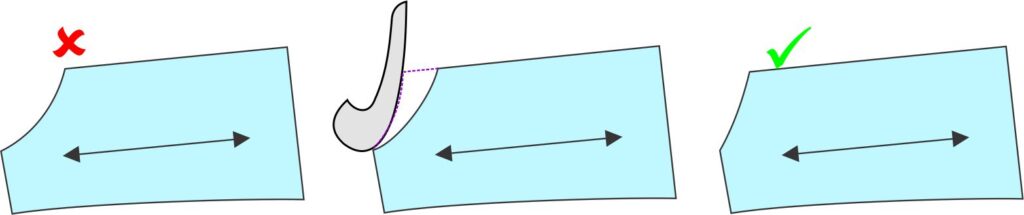
The position of the strap on the back band determines how close together the straps are in the centre back, or how far apart that are. This can make the straps fall off the shoulders if the strap scoop is too wide, or may make you feel like you are being strangled, or cause the bra band to ride up if they are set too close. Luckily for us, their position is easy to change as shown in the diagrams below. Mark a point along the top of the back how much you want to move your strap in or out. Remember though that a small adjustment here can translate to a lot on the back because the fabrics will be stretched when the bra is fastened. A little goes a long way. Then use your curve to redraw the line. Easy peasey!

The hook-and-eye closure is the final connection point of the band, and its size and placement affect the entire back band. A closure that is too short may concentrate stress in one area. A closure that is too tall may alter the balance of the back band.
When changing Hooks and eye height, consider:
To alter a bra pattern to change the hook and eye height, mark a point along the centre back line the distance (either up or down) of the hook and eye set distance. This is the distance between the hook and eye you are planning to use. Most hooks and eyes use a 3/4″ (28 mm) spread, but some use 5/8″ (15 mm). Use your Bra Design Curve to draw a new strap curve.
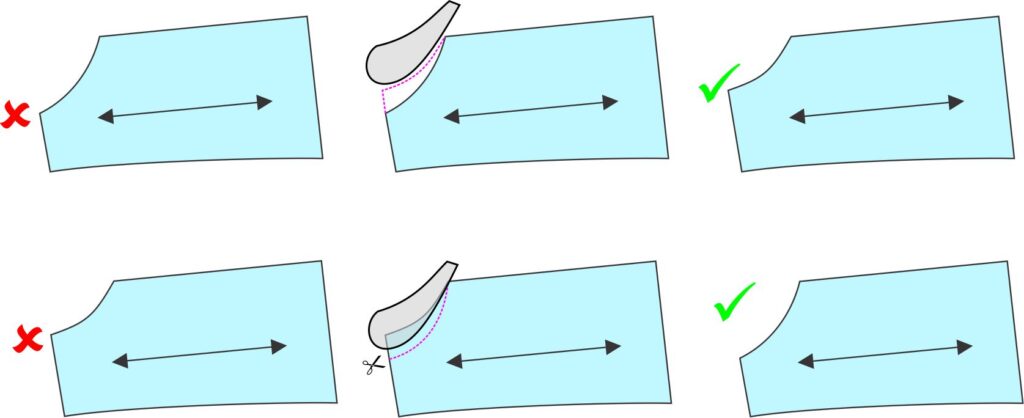
When the top edge of the back band gaps away from the body, it is often a sign that the band shape does not match the wearer’s body.
Possible causes include:
To alter the bra band pattern to eliminate the excess, requires shaping the band with a dart, which adjusts the pattern so the band follows the natural curve of the body rather than simply shortening it. here’s how to do it:

The center front gore should ideally lie smoothly against the sternum. When it stands away from the body, the problem is almost always a cup issue, but it can also involve the band and frame. The important diagnostic step is determining whether the gore is being pushed away by insufficient cup space or pulled away because the frame is not stable. A band that is not providing adequate anchoring can allow the entire front of the bra to shift. We’ll discuss this whole topic in the tutorials on cup fitting.
Possible causes include:
The temptation when fitting is to make the quickest change possible. However, professional bra-making requires understanding the relationship between all components. A shorter band affects the cups. A different elastic affects the band tension. A different wire affects the cradle. A different fabric affects everything. Every alteration creates a ripple effect. That’s why i always recommend you do one alteration at a time. The goal is not simply to make a measurement match – it is to create a bra where all components work together harmoniously.
A well-fitted bra is not created by chasing individual measurements. It is created by balancing forces. The band is the foundation, but the foundation must work with the cups, wires, elastics, fabrics, and the unique shape of the wearer. Measure carefully. Diagnose thoughtfully. Alter intentionally.
Consider joining our private group for all bra-making enthusiasts. We share knowledge and encouragement at Beverly Johnson’s Bra-making Support Group