Don’t draft your bra – clone your favourite instead!
Clone your Favourite Bra
Perhaps you have a favourite bra, one you could wear all day and never know it is on. Except…now it is discontinued, or the elastic has died, or the lace is torn. But it still fits. Do you find yourself wishing you had purchased ten of those bras when you had the chance?
Whatever your reasons for wanting to duplicate your favourite bra, you will find the following method to be quick, easy and accurate. The best part is, in most cases, you don’t need to take the original bra apart.
The cloning method is a technique I developed and perfected over 35 years and is still the best method for duplicating a bra that fits, with the least amount of alteration.
In this tutorial, we will apply the principles of Bra Engineering to the process to clone your favourite bra. This process I call the ADMIRE process.
ANALYZE
Is this bra worthy of your efforts to copy it? Look at the fit of the cups with a critical eye. The breast mass should be fully contained within the cups, with no bulges over the top, the sides or from underneath. The wire, if there is one, should run around the outside of the breast, neither pushing into breast tissue, nor sitting away from the breast toward the underarm.
Ideally, the strap should run in a slightly angled line from the bust point to the shoulder; however, this can be changed after the cloning is done. The band should be snug around the body but not tight. The bridge should fit flat against the chest wall. This is a common area for a poor fit in a bra.
For the bridge to lie flat against the chest wall, the cup volume must be adequate, and the bridge must be the correct width for the span between the breasts. Happily, adjustments can be made to the width or angle of the bridge later. The cups are the most important element of the whole bra and while minor changes can be made to the fit of the cups, cloning a bra that doesn’t fit in the cups is useless.
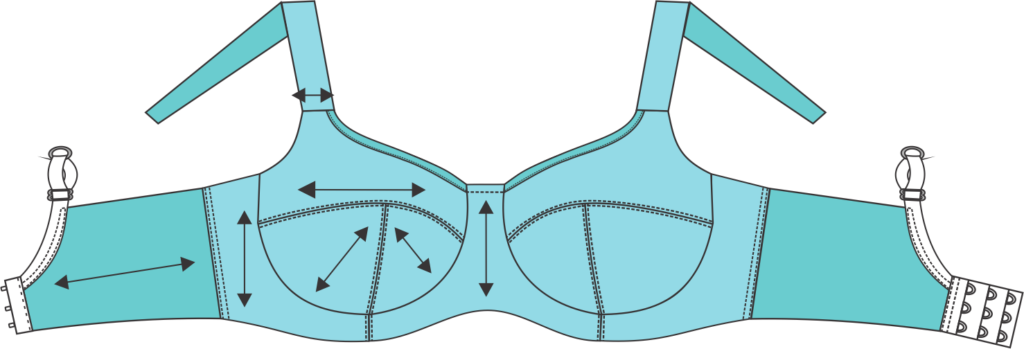
Look at its construction. Use a washout marker to indicate the direction of greatest stretch, called “DoGS” for short. Mark the DoGS on all the parts of the bra, even ones you think do not stretch. You will find that virtually all parts of a bra have at least mechanical give in the fabrics. The cups can be made of stretch or non-stretch fabric, depending on the style and support level of the original. You will still need to mark the direction of the greatest “give” on these pieces.
The bridge is always non-stretch, whether made from interfaced fabric or two layers of a non-stretch fabric; this area needs to be rigid for correct support. Mark the direction of greatest stretch (or give) directly on the pieces with the washout marker, you’ll find this most helpful later on.
You’ll also need to mark the centre front at the top and bottom of the bridge if there is one.
Take note of the fabrics used in the cups, frame, back band and straps. They may look the same, but are they? RTW almost always uses fabrics that are dyed exactly to match, but upon closer examination, the back band is almost always a different fabric from the cups and/ or frame. If the cups have no stretch or very little stretch, you need to know how much stretch the fabric has in order to use the same type in your clone.
DESIGN / DRAFT
Collect the drafting materials. You will need a ½” (12 mm) foam core board (found at arts & crafts stores or stationers supply). They usually come in 20” x 30” sizes and that is adequate to do even the largest bras.
You will also need thin see-through drafting paper, which is the same as doctor’s examination table paper, available at medical supply houses or paper suppliers. The key to the paper is to have it thin and see through. Do not use freezer paper, heavy craft paper, or “net” pattern tracing cloth – they will not do the job properly.
You will also need some slender T-pins (1” – 1.5” long), glass or plastic headed pins, a sharp pencil, and a ruler.
Lay the paper over the foam core board, pinning the corners to keep it from curling back.
Remove the underwire from one side of the bra (if there is a wire). You are going to copy the bra by systematically pulling each section of the bra to its original flat fabric size, then using these pieces as the pattern for your own bra.
I like to use the right half of the bra, but it really doesn’t matter, as long as you stay with one side to do the cloning. The wire is easiest to remove and return to its original state if you unpick the stitching at the centre front of the bra, slide the wire out and save it for later.
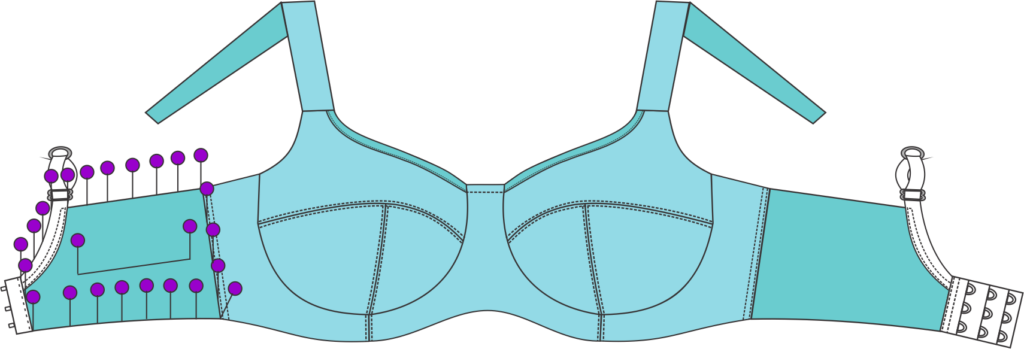
Start with the back band which gets one of the largest pieces out of the way and the easiest to clone. Use the glass headed pins to pin the band to the foam core board, pulling the band slightly to return the fabric to its pre-elastic application size. You will know it is right when all the wrinkles are gone from the fabric, but it is not stretched. You will be pinning just at the edges of the fabric, and at every seamline. I define a seamline as a point where one fabric sews to another. Do not get seamlines confused with topstitching, which is found on every bra. Be observant about possible seamline locations – for example, often there is a short seamline under the cup area. Stick the pins in fairly deeply into the foam board, but no more than ½” apart, and more often in areas where there may be confusion about the exact shape. You will also pin each end of the DOGS.
Now unpin the bra, but DO NOT move the paper. You will find the pinning of the bra into the board through the paper has created a series of dots that duplicate the shape of the original in every detail. Connect the dots around the perimeter with a pencil.
The pinholes, if you use sewing pins will be very small, which is why I prefer slender T-pins. The t-pins make holes that are large enough to see after the bra has been removed from the board. If you use t-pins that are too large, the points may damage the original bra.
Look at the bra again and determine which edges are seams and which have elastic applied. The fabric-to-fabric seam allowances are usually ¼”, while the elastic allowances are equal to the width of the elastic being used. For example, the bottom band elastic could be 13 mm (½”), but on larger sizes, it may be 19 mm (¾”); while the top band elastic is usually 10 mm (3/8”), but some are 13 mm (1/2”). Along the back strap elastic, you may not need any allowance, because of how you pinned along the back strap curve. If the original bra uses fold-over binding along the neckline edge (as this one shows) there is no seam allowance added.
Write the width of the elastics and their allowances along the edges and then draw them in using a small ruler. You can always change the width of the elastics later but for now, duplicate everything as in the original. You will find it less confusing. You will also mark the DoGS. This should be easy as you have already determined that while pinning. You are ready to repeat the process on the other parts of the original bra.
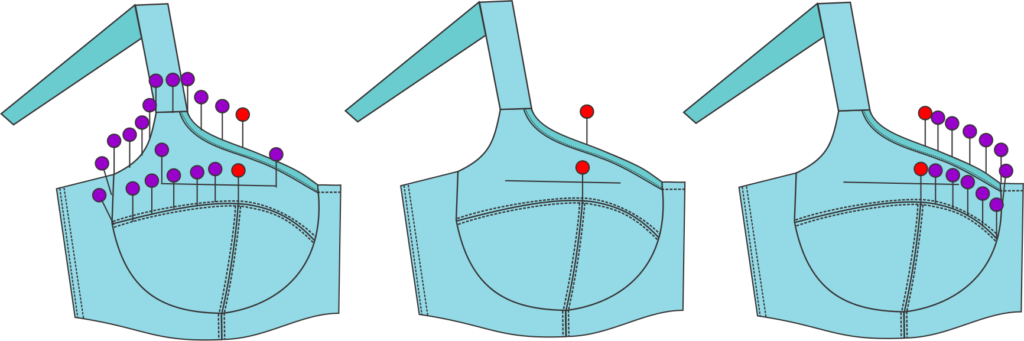
Sometimes, a piece like the upper cup cannot be flattened to the board because too many other pieces are sewn to it. To pin such a piece, you will need to pin as much as you can, then unpin the beginning the end to the center pins to free up the fabric, keeping the pins set at the apex and above the apex to mark your spot. This unpinning allows the upper cup to pivot around so it can be pinned again until the piece is finished.
Keep pinning until all the pattern pieces are finished, with seam allowances added. Do not fall into the trap of pinning and thinking you will do the details later! I cannot stress enough the importance of completing each piece before you move onto the next.
I always label the pieces too and write on them with the lettering as if I am looking at it being worn. For example, write “band” across the longest part of the band as if you were looking at it on someone, otherwise there could be some doubt as to which end is up. Indicate any places where seams intersect, as in the case where a lower cup may be two pieces attaching to a one-piece upper cup. I use a notch or a dot to mark this junction.
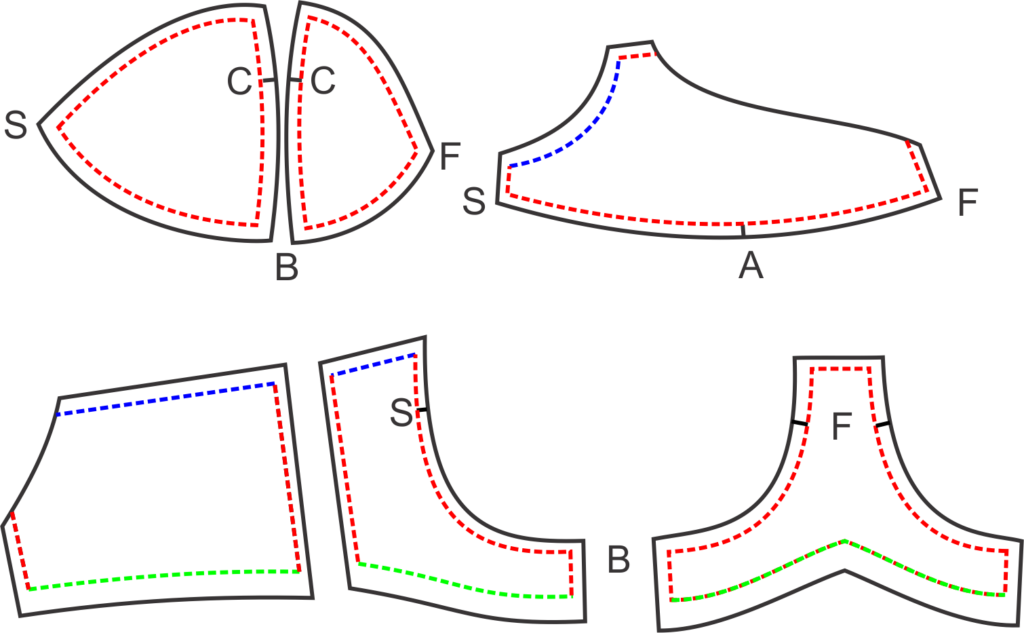
The bridge spans the distance between the breasts, but if you have marked the centre front at the top and bottom, you only need to pin one half. Be accurate about the centre front as this is an area where a little misjudgment can spell disaster. Draw the CF line with a ruler and mark it to be cut on the fold. You will not cut out the fabric this way, but you will make a single pattern unit from this one half.
Don’t despair if the bra you want to clone is a seamless bra, even these cups can be duplicated easily. However, since these cups are made by heat setting the fabric over a hot breast-shaped mold, you need to make a seam in the bra you make. You will get the same fit in the cup, which is really what you want anyway!
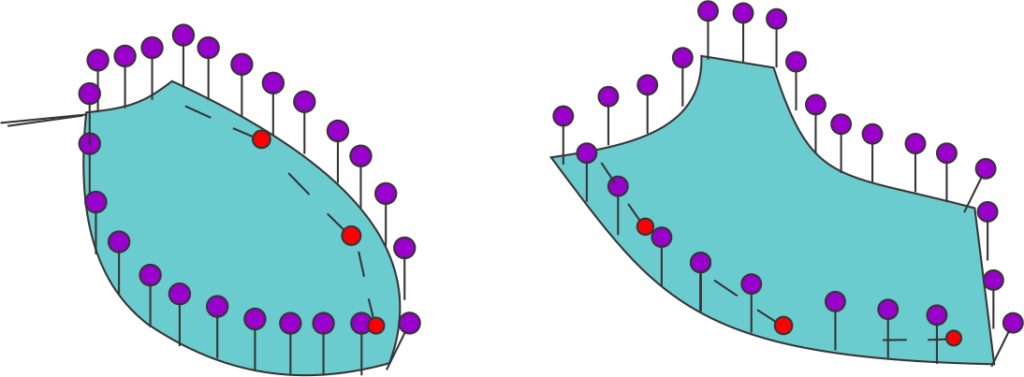
For a seamless bra clone, first put the bra on and mark where the bust point should be with a wash-out marker. Note the point is where the bust point should be – not where it the nipple may have settled! Once the bust point is marked, you need to decide on a seamline direction for your bra.
Fold the bra where you want the seam to be, making sure one point runs through the bust point. You know the fold is right when the fabric lies as flat as possible. On an older bra, the fabric might not lie as flat as on a new bra, but it will always lie flattest when the fold runs through the bust point. Mark the folded edge with a wash-out marker and pin it. Proceed to pin one side of the cup (red pins) with the other side folded under it, keeping the wash-out marker line right at the fold. Pin all around this half of the cup, pinning right through the layers underneath. This is the beauty of this method! Once one side has been done, and marked, flip the cup over and do the other side.
Once the pattern has been drawn, it is time to check the pieces for accuracy. Put the pattern pieces together along the seamlines and “walk” them around, making sure the two pieces are the same length, making adjustments if necessary.
MAKE
You’ll want to sew the cloned bra from fabrics that are as close in nature to the original. For example, if the original cups were Antron tricot, there’s no point in making the new cups from Spandex, the cups will not fit the same. Likewise, if the band is made from Power Net, you will want to look for fabrics that offer the same firm stretch characteristics.
You can take a tracing of the original wire and compare the drawing of it to the ones here on my website , where you can identify the size and shape so you know what to order from your local bra supply shop or from sources online (see the resources at the end of this post). Since there really is no consistent standardization in the bra industry, just requesting a 36C wire (for example) is no guarantee that you will get the same size wire that was included in the original bra.
INSPECT & IMPROVE
Fine-tune some of the fitting areas to make this bra pattern into the “perfect bra” pattern. Common areas for fit adjustments include the shoulder strap position and the bridge width.
My advice for fitting is to assess the fit overall. The band can easily be shortened or lengthened like shortening a sleeve: do the adjustment in the middle of the piece and not at the ends.
If the bridge is too wide or too narrow, check to see if it needs adjustment on the whole of the centre front, or just at the top or the bottom of the bridge. It may not be a uniform adjustment.
If the cups are too big or too small, you can add to or remove a small amount all around the wire line. You also must adjust the wire line to fit the new cups.
In most cases, if done correctly and accurately, there will be very little alteration to the cloned bra.
REVIEW
Document as you go along, making sure you note any adjustments you make. Take photos of the bra on the table and on you to pinpoint fit issues you might not be aware of. Make note of the fabrics, findings you used and the amount of fabric mechanical give. You could also make note of the time spent on each part of the process.
ETHICAL CONCERNS
Was this process repeatable? Was it safe, easy or practical to do? Was it affordable? Did it result in a viable finished product? If the answers are YES, you know you can clone your favourite bra successfully. It’s to be ADMIRED!