
Let’s set the scene. You have your dream bra pattern printed. You have your gorgeous kit – maybe some import-quality black lace and silky duoplex. Your rotary cutter is poised. You just want to sew the pretty thing already.
Stop. Put the scissors down.
Welcome to the most frustrating, yet most crucial, part of lingerie sewing: The Test Bra.
It is incredibly tempting to skip this step. We want instant gratification. But here is the hard truth: bra sewing is 20% stitching and 80% engineering. Because breasts are squishy, 3D, gravity-defying entities, two-dimensional measurements can only get us in the ballpark.
If you cut into your expensive fabric now, there is a very high chance you will end up with a beautiful, lacy garment that pinches, gapes, or provides zero support. That’s where a test bra becomes critical.
Today, we are learning to love the test bra. We’re going to look at why you need one, what fabric to use, and most importantly, how to “read” wrinkles to get that perfect fit.
If you sew a test bra and it looks terrible, your first instinct might be to blame your body. “My boobs are weird. Nothing fits me.”
Incorrect. Your body is fine. The pattern is just a standard draft that hasn’t met you yet.
A test bra is simply data collection. You are building a prototype to see how the standard draft interacts with your unique combination of tissue density, root width, and projection. It is much better to learn that you need an adjustment on $5 metre fabric than on $30 metre imported lace.
Do not use quilting cotton for a test bra. It has no give and will not mimic how lingerie fabric behaves under tension. For your test bra, you want fabrics that mimic the mechanical properties of your final materials.
Note: You don’t need to put elastic on the neckline or underarms of a test bra, but you absolutely must apply the bottom band elastic and strap elastic to check the support. Neckline stabilizer is a must as well. Here’s why.
Okay, you’ve sewn your Frankenstein-looking test bra. Put it on in front of a mirror. Stand up straight.
Do not look at the bra as a whole; look for specific symptoms. The wrinkles are trying to tell you something.
The Look: Your breast tissue is spilling over the top edge and the underarm areas of the cup, creating four “boobs” instead of two. It looks painful and lumpy under a t-shirt. There also could be breast tissue peeking out from under the bra. The Diagnosis: The Cup Volume is too small. The Fix: You need to go up one (or maybe two) BCD size(s). If it’s only a tiny bit of spilling, you might just need to add to the upper cup pattern piece.
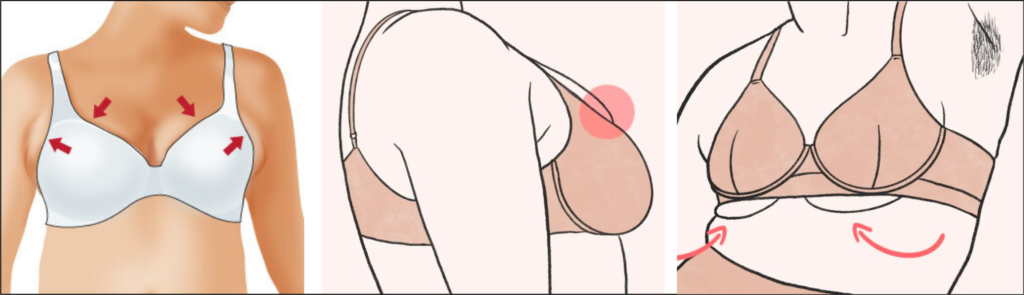
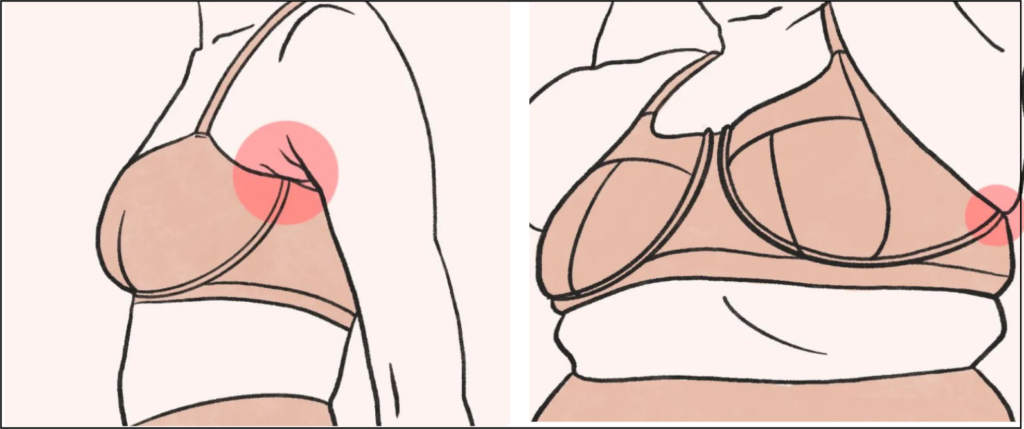
The Look: There is empty fabric wrinkling right at the nipple (the apex), or the cups look pointy and “Madonna-esque” when you want a round shape. There could be wrinkles along the neckline edge, or significant gapping. The Diagnosis: The cup is too big OR too projected for your shape. The Fix: If the neckline gaps or is too large, you may be able to get away with shortening the neckline edge. But if the breasts are sagging or have lots of vertical wrinkles, you need to go down a BCD size. If going down a size makes the frame too narrow, you might have a “shallow” breast shape, meaning you need to flatten the cross cup curve of the cup seam slightly.

The Look: When you look in the mirror over your shoulder, the back band is arched up between your shoulder blades instead of sitting horizontally across your back. You feel like you constantly have to pull the bra down in the back. The Diagnosis: The band is too loose. It’s riding up because it’s seeking a narrower part of your torso to grab onto. The Fix: You need a smaller band size. A loose band provides zero frontal support.
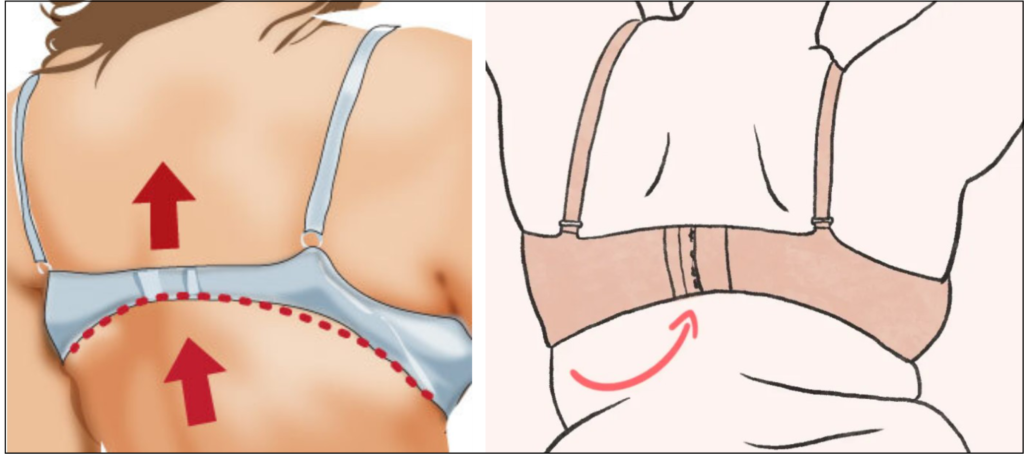
The Look: The center piece between the cups (the gore) is floating away from your sternum. You can easily slide several fingers underneath it. The Diagnosis: This usually means the cups are too small. The breasts can’t fully get into the cups, so they push the entire frame away from the body. Alternative Diagnosis: If you have very close-set breasts, the gore might just be too wide to fit between them to lay flat. If the cups seems to fit well, except for that, you may want to try a wire suited to Omega shaped breasts, such as the Vertical Wires.
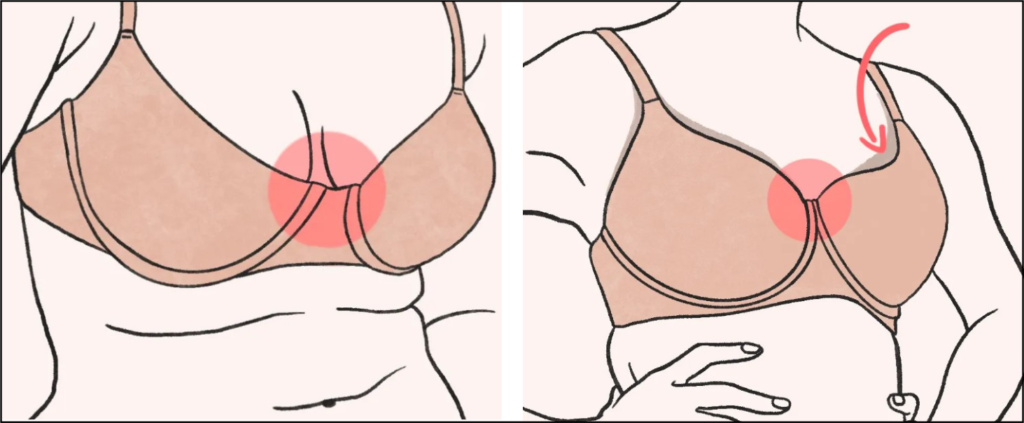
The Look: The wires are sitting on the breast tissue at the side, and are not comfortable to wear. They can actually poke into your skin, and they often break in two at the bottom. The Diagnosis: try a larger diameter wire, so an #42 instead of a #40 for example. Alternative Diagnosis: Sometimes the flat spot at the bottom of the cup means the wire cannot snug up properly because the frame is too small, or the lower cup needs a seamed that has more curve to it, sometimes just 1/8″ (3 mm) more per side.
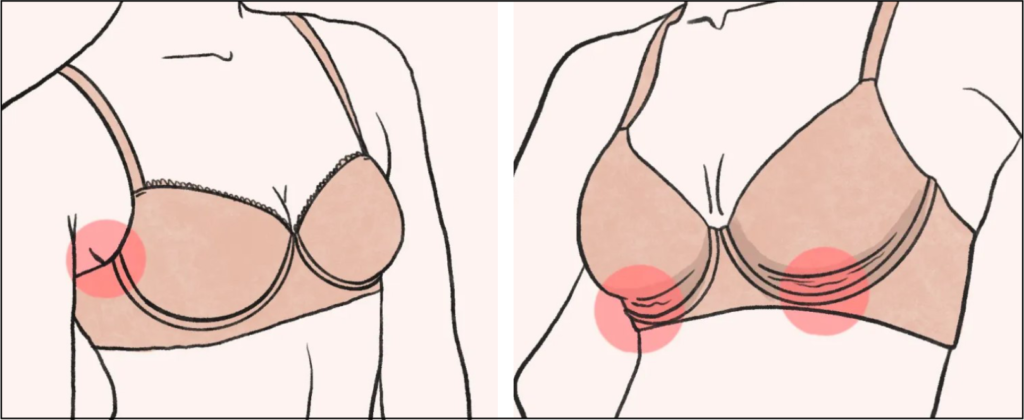
The Look: Wires sit back behind the breast and tend to poke directly in the armpit. Sometimes the wire slides down the body and settles on the ribs. The Diagnosis: This usually means the wire is too big. It slides down the body because because the wire line of the frame is too large. Yes, that flat spot could also mean that the wire is too big OR too small. It’s a tricky little problem to fix. Alternative Solution: When measuring for a wire, raise the arm up in the air and measure with the wire on the naked breast.
Once you have diagnosed the issue, what do you do? Here is a quick glossary of common adjustments you might need to research for your second draft.
It is very rare to get a perfect fit on the first try. A test bra isn’t a failure; it’s a roadmap to success. Take photos of yourself in the test bra from the front, side, and back, mark the issues directly on the fabric with a sharpie, and get ready for draft number two. The reward when you finally cut into that good lace will be worth it!
Join my Facebook group to meet other bra-making enthusiasts!